Uncategorized

Fingerloop Braiding for my Sweete Bag

_MG_2573

2-1-14 Casa Mellin – The sweet bag continues to come along slowly. I am in the final stages working on the trimmings. Today I worked on the drawstrings and handle. The width of my bag is 5.5″, an average width on sweet bags I surveyed from the V&A. So a drawstring is normally twice this width with a couple of extra inches. I targeted my drawstrings to be a finished length of around 15″. The handle varied in length but according to Jacqui Carey’s survey of bags for her book, “Sweet Bags”, quotes 60cm or about 23.5 inches to be an average length.

Fingerweaving was a technique used to make purse strings and lacings in period. There are dozens of patterns created by this technique involving one or more workers. The handle and drawstring braid patterns typically match in period examples. Braids are created using all silk or a combination of silk and silver or gold passing threads. I chose a common pattern that had metallic passing threads in a chain pattern with silk border. This is referred as a French string in a 17th century pattern book written by Lady Cecilia Bindloss Standish.

The French string pattern actually involves 3 workers with 10 bowes of silk and 2 of silver or gold passing thread. The pattern I used is referenced as the Grene Dorge from an early 15th century manuscript translated by Lois Swales in “Purse Strings and Lacing Points”. This pattern is made from 6 bowes, 4 of one color and 2 bowes of two other colors and can be done by one worker. If you substitute the 2 other colors for metallic threads of one color you get the French string look. This is the pattern referenced in “Seventeenth-Century Women’s Dress Patterns: Book Two” on page 141 that surveys a sweet bag from the V&A.

To determine the length of bowes needed, take the final length you want then add 1/3 to it. Take this and double that for the length of silk or metallic thread used. I added another 2 inches since there is wastage at each end. I need two drawstrings about 15″ long and a handle about 24″ long. So my calculations to determine the length of each string is below.

15 x 1 1/3 = 20 x 2 = 40 + 2 = 42″ – drawstrings
24 x 1 1/3 = 32 x 2 = 64 + 2 = 66″ – handle

Here is a link from a great site managed by Zoe Kuhn and Lois Swales with directions for the braid I did.

http://fingerloop.org/patterns.html#n06

If you own Seventeenth-Century Women’s Dress Patterns Book 2, page 141 has directions as well.

References:

Carey, Jacqui. Sweet Bags:An Investigation into 16th & 17th Century Needlework. Devon, UK:Carey Company, 2009.

North, Susan & Tiramani, Jenny. Seventeenth-Century Women’s Dress Patterns, Book Two. New York:Harry N. Abrams Inc., 2012.

Swales, Lois. Purse Strings and Lacing Points: Instructions from an Early Fifteenth Century Manuscript. Not published, 1997.

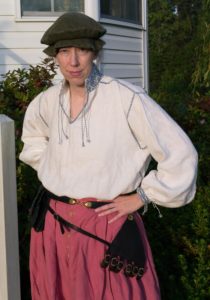
Man’s embroidered shirt

“These shurts are wrought throughout with nedle work of silke, and such like, and curiouslie stitched with open seam. ” Phillip Stubbes, the Anatomie of Abuses, 1583.

Once I finished the Jamestown shirt, I was able to once again work on my own shirt. I originally started the project in October 2012. The shirt pattern is based on a boy’s shirt from Janet Arnold’s Patterns of Fashion volume 4 on page 17. However, several patterns were reviewed for various options and techniques. I wanted monochrome embroidery and open work seams.

CIS:T.112-1972
Boys shirt in the V&A

I planned to embroider the collar and cuffs and possibly the front opening. Based on the thread count of the material I was using, I needed a tall collar to get an intricate design. Since the collar was relatively tall I decided against a ruff.

The cuffs needed to be rather narrow due to my tiny wrists, so the design for this was simple. I had planned for ruffs on the cuffs as well, but decided I liked the look better without them.

The pattern was pretty straight forward as I had made various versions of shirts/shifts prior to this. I used measurements that worked for those. This pattern does not have the shoulder gores often found in shirts/shifts from the period. So I tried without them. I failed to account for their lack in my  measurements so the shirt did not fit or lie properly when assembled.

This was a minor setback as the entire shirt was assembled with open work seams. However, once the gores were added everything fit great! Only lost a couple hours work. So for future reference different chest measurements are in order for shirts/shifts without gores in the shoulder/neck area.

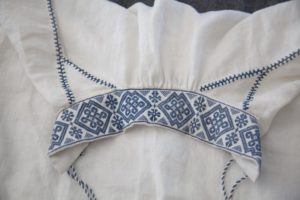
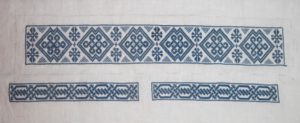
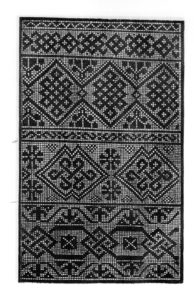
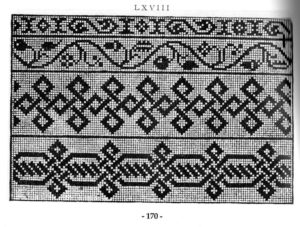
I wanted a geometric pattern with blue thread for a manly look. The period shirt I based mine on uses cross stitch of a geometric pattern. I choose embroidery patterns from period pattern books: Esemplario di Lavori Vavassore for the neck and Giovanni Ostaus plate LXVIII for the cuff’s. The cuff pattern was adapted somewhat as it was too tall for the narrow cuff’s so I just cut off the top and bottom parts.

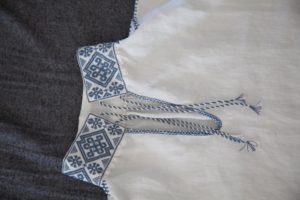
Collar and cuff embroidery completed

Collar pattern from Vavassore in center

Cuff Pattern from Ostaus

The shirt pieces were individually hemmed with a rolled hem using a whip stitch of waxed linen thread. The end of the sleeves were sandwiched in between the cuff’s. While the neck pieces were finished individually and then stitched together with waxed linen thread. All other pieces were assembled with an open work seam with the blue silk used for embroidery.

I love the decorative effect of open work seams. My first attempt was the Jamestown shirt with a relatively simple stitch. For this shirt I tried a new stitch. Janet Arnold’s Patterns of Fashion 4 shows a few examples on period pieces and in her opening remarks on page 6. Sadly they are not clearly defined or does she show you how they are created.

Referencing a modern stitch book from the early 20th century, Samplers & Stitches by Mrs. Archibald Christie, I found a stitch called tailor’s buttonhole that creates a knotted tight seam. This looked like some of Janet Arnold’s examples so I moved forward with it.

The front neck slit has a simple working of thread that I created on the fly. I liked the simple look.

Finally, the 7-8 inch long ties are all finger weaving using 8 bows, 4 of white and 4 of blue silk in a spiral pattern. It took 80″ of thread per bow to create 26″ of usable cord.

i enjoyed creating this shirt. I did not have everything planned out from the beginning. For example I did not choose the patterns to embroider until I was ready for that step, nor did i have the open work seam worked out until I got to that part. When starting a project I often feel overwhelmed at all of the steps involved. This approach made it easier to tackle each step. And it broke up the research as I went along. 

Materials used:

  •  off white linen fabric – 40 thread/inch – unknown brand
  • off white linen thread – unknown brand
  • Soie Perlee #356 blue
  • white silk – unknown brand

Total estimated time – I’m bad and didn’t keep track of everything, research, practice and assembly – 90-100 hours

1993 Mousehole

Alan dug up this old newspaper article on the Mousehole held in May 1993. See if you can spot young Master Bedingfield, Roguish Master Hamilton, and identify any of the melee fighters. 🙂

Hello World!

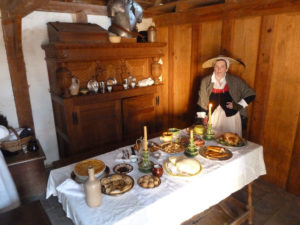
Starting off the Gardiner’s Blog. Look for fun posts on coming projects. In the mean time, here’s a picture of Laura with her Food’s and Feasts display from Jamestown 2011